Most people waste 20–30% of their dumpster space without realizing it. Poor dumpster loading techniques cost renters money and create unnecessary trips.
We at Dumpster Solutions NW have helped thousands of customers across Washington State pack smarter. This guide shows you exactly how to fit more into your rental and keep your project on budget.
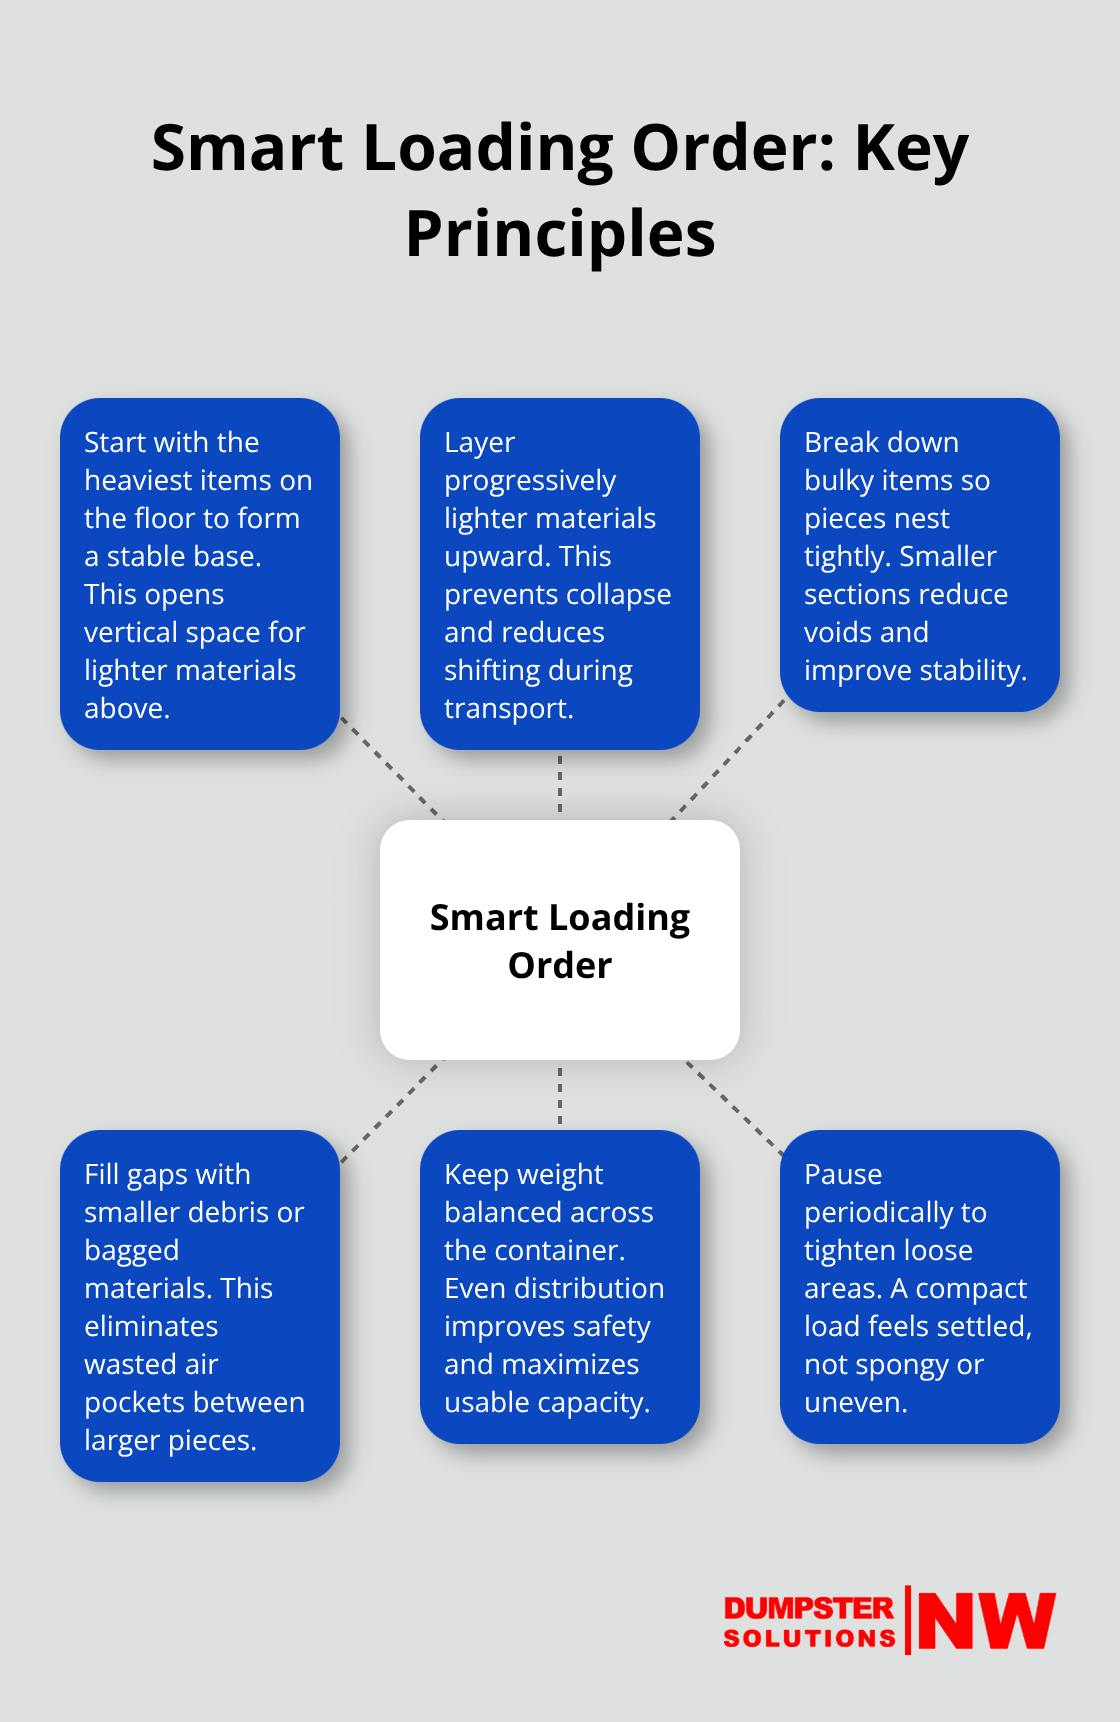
The Right Loading Order Wins Every Time
Start with the heaviest items on the dumpster floor, not in the middle or on top. Concrete chunks, heavy wood beams, and dense materials create a stable base that prevents shifting during transport and opens up vertical space for lighter materials. King County Solid Waste Division specifies that bulky items over 2 feet by 2 feet by 2 feet or weighing more than 200 pounds need approval, but standard heavy debris like flooring or lumber doesn’t face these restrictions. Place your densest materials first, then layer progressively lighter items upward. This approach cuts wasted space by preventing collapse and keeps your load balanced. Many renters toss items randomly, which creates air pockets that swallow 15–25% of your rental capacity without adding any actual waste.
Break Everything Down Before It Goes In
Large furniture, wooden cabinetry, and cardboard boxes take up massive space when intact. Disassemble sofas, break down bookcases into flat panels, and flatten every cardboard box before loading. Flattened boxes compress to almost nothing and stack efficiently, while intact ones waste cubic feet of air space. For concrete, large wood pieces, or other hard materials, break them into smaller sections so they nestle together rather than sitting loosely. This single step-breaking down bulky items-recovers 20–30% of lost space. Fill the gaps between larger pieces with smaller debris, bags of waste, or soft materials like cloth and textiles. Small items settle into the voids and eliminate dead air that rental fees charge you for anyway. The goal is a compact, interlocking load where minimal empty space remains visible between items.
Stack Smart for Vertical Advantage
Place flat items at the bottom to create a solid platform, then arrange bulky mid-sized items in the middle section, and use lighter materials or bags on top. This layering method maximizes height usage without creating top-heavy instability that causes shifting. Keep the weight distributed evenly across the container floor rather than concentrating it on one side or corner. An unbalanced load becomes a liability during transport and limits how much additional weight you can safely add. Monitor your load as you fill it-stop occasionally and look for gaps or loose arrangements that need tightening. A properly packed dumpster feels compact and settled, not loose or spongy.
Avoid the Common Packing Pitfalls
Air pockets between items represent pure waste. Items that sit loosely or protrude at odd angles create voids that add nothing to your project but cost you money. Packaging materials (plastic wrap, foam, excess cardboard) inflate volume without adding substance-remove them before loading. Haphazard stacking without a plan leads to unstable loads that shift during transport and waste precious cubic feet. The difference between a thoughtful load and a random one often amounts to an entire extra rental trip, which doubles your disposal costs. Proper packing eliminates these mistakes and keeps your project efficient.
Now that you understand how to load your dumpster strategically, the next step is selecting the right size for your project in the first place.
Where Your Dumpster Space Actually Disappears
Air Pockets Waste More Than You Think
Air pockets between items represent the biggest silent killer of dumpster capacity. When you toss materials randomly without thinking about how they fit together, gaps form naturally between irregular shapes. These voids consume 15–25% of your rental space while adding zero waste to your project. The problem worsens with soft, compressible items like old clothing or cushions that shift during transport, creating even larger empty spaces.
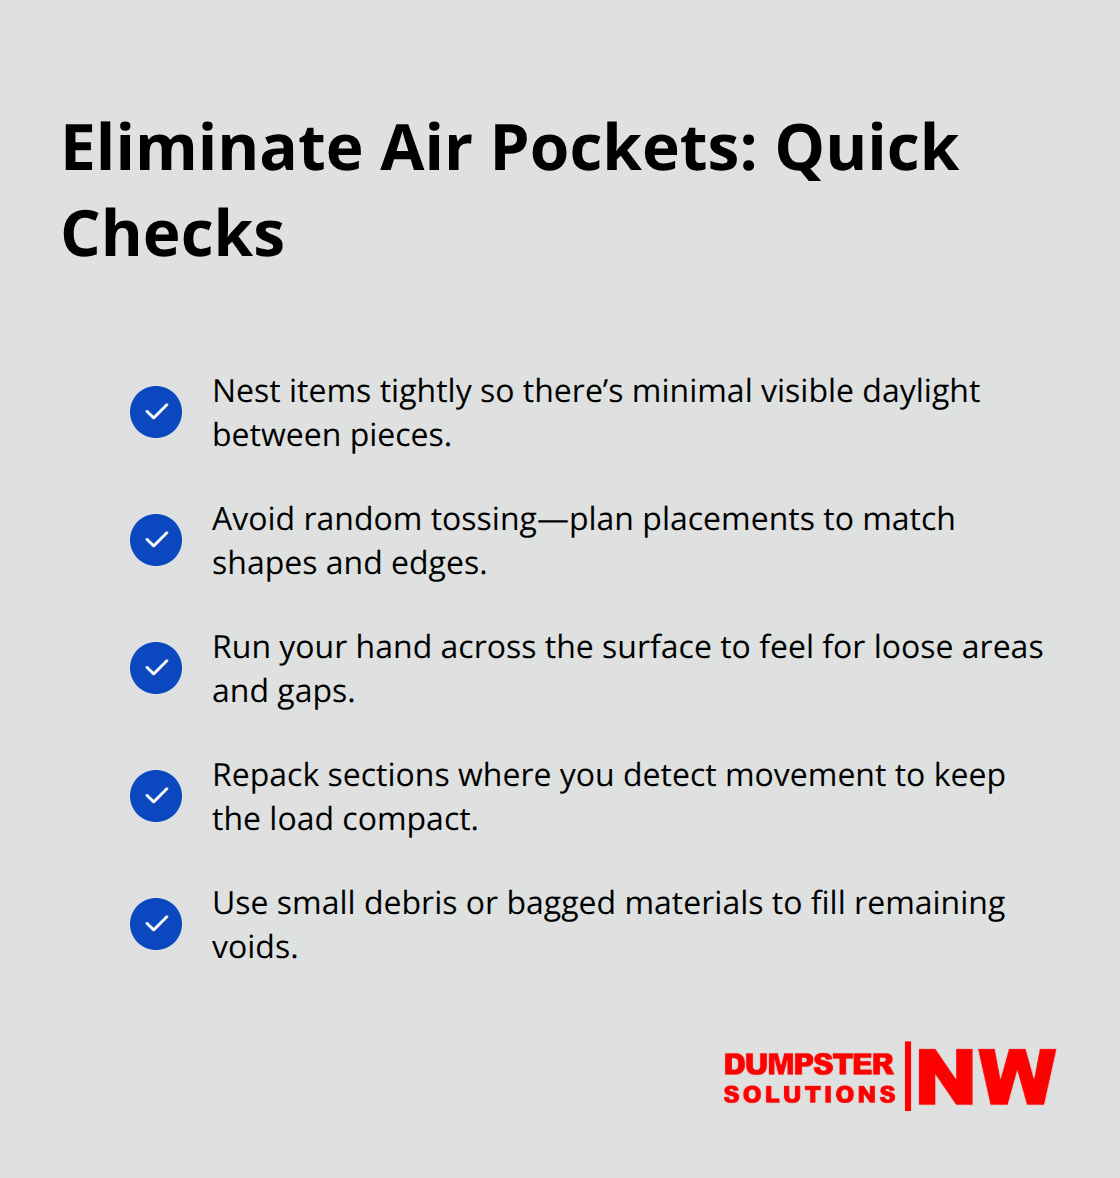
Dense packing eliminates these gaps entirely. Items should nestle against each other with minimal visible daylight between them. Test your load by running your hand across the surface-if you feel loose areas or can spot gaps, you haven’t maximized capacity yet.
Packaging Materials Inflate Volume Without Substance
Packaging materials amplify waste dramatically. Plastic wrap, foam insulation, cardboard packaging, and excess corrugated boxes inflate volume without substance. Remove all packaging before loading to recover significant space. A single refrigerator still wrapped in plastic and foam occupies nearly double the space of the same unit unwrapped.
King County Solid Waste Division notes that cardboard should be recycled rather than disposed, which also frees up dumpster capacity for actual debris. Break down every box completely flat, separate foam pieces, and discard wrapping materials at recycling centers. This preprocessing step takes minutes but recovers cubic feet of rental space.
Strategic Stacking Prevents Waste and Instability
Haphazard stacking without a loading strategy guarantees wasted space and unstable loads. Random placement creates towering, unstable arrangements that shift during transport, compress unevenly, and leave dead zones throughout the container. A thoughtful approach starts with your heaviest, most stable items forming the foundation, then progressively lighter materials layer upward.
Organize your debris by category before loading begins-separate concrete from wood, metal from drywall, and soft materials from hard ones. This sorting step prevents items from settling unevenly and allows you to position similar pieces together where they stack naturally.
Weight Distribution Determines Load Capacity
Weight distribution matters enormously. Concentrating heavy items on one side or corner creates imbalance and limits additional weight capacity. Spread weight across the entire dumpster floor, keeping the heaviest pieces near the center. Monitor your load as you fill it. Stop every few minutes and look for loose items, protrusions, or gaps that need adjustment. A properly packed dumpster feels settled and compact, not spongy or loose.
The difference between thoughtful packing and random tossing often amounts to an entire extra dumpster rental trip-which doubles your disposal costs and extends your project timeline unnecessarily. Once you master these packing fundamentals, selecting the right dumpster size becomes your next critical decision.
Getting the Right Dumpster Size Matters More Than You Think
Selecting the wrong dumpster size creates cascading problems that no packing technique can fix. Too small, and you’ll overfill and need expensive additional trips. Too large, and you’ll waste money renting cubic yards you never use. This mistake happens constantly across Seattle, Tacoma, Auburn, and throughout the Puget Sound region. The solution is straightforward: estimate your debris volume accurately before renting. Start by categorizing what you’re throwing away-demolition debris, yard waste, furniture, or mixed household items occupy space differently. A full kitchen renovation with cabinetry, drywall, and flooring requires significantly more capacity than a garage cleanout with boxes and old furniture. King County Solid Waste Division restricts certain items, which means some projects need advance planning. Most homeowners underestimate volume by 30–40%, so add a buffer to your initial calculation. If you’re uncertain, contact your rental provider-they’ve handled thousands of projects and can recommend the right size based on your specific waste type and project scope.
Sort Materials Before Loading Begins
Sorting materials before loading cuts packing time by half and improves space efficiency dramatically. Separate concrete from wood, drywall from metal, and soft materials from hard debris. This preprocessing prevents items from settling unevenly and allows similar pieces to stack naturally together. When concrete chunks nestle against other concrete, they interlock efficiently. When wood planks stack with other wood, they compress tightly. Mixed piles force awkward arrangements that waste space. Spend 30 minutes sorting on the ground before anything enters the dumpster. Group items by weight too-this makes layering intuitive since you’ll load heavy materials first anyway. Electronics, batteries, and hazardous items like used motor oil or fluorescent bulbs must stay separate entirely, as King County prohibits these from standard disposal. Identifying prohibited items during sorting prevents contamination and keeps your project compliant. This approach transforms loading from chaotic to methodical and recovers 15–20% of wasted capacity through better arrangement.
Stack Deliberately to Maximize Vertical Space
Most renters pack horizontally and waste the height available above their heads. Standard dumpster heights range from 4 to 8 feet depending on size, yet many people fill only halfway up the sides before declaring the container full. Stack items deliberately from bottom to top using the full vertical dimension. Place your heaviest, most stable items on the floor, then layer progressively lighter materials upward. Flat items like plywood, drywall, or flooring create platforms that stabilize upper layers. Bulky mid-sized items like furniture or cabinetry fit in the middle section where they’re supported by the base layer. Lighter materials, bags, or soft waste occupy the top section. This stacking method adds 20–30% more capacity than random packing. Keep weight distributed evenly across the container floor rather than piling everything on one side. An unbalanced load becomes unstable during transport and limits how much additional weight you can safely add. Monitor your load as you fill it-every few minutes, stop and assess whether items are settling properly or if gaps have emerged that need filling with smaller debris.
Distribute Weight Across the Entire Container
Weight distribution determines how much total capacity you actually have. Concentrating heavy items on one side or corner creates imbalance and limits additional weight capacity. Spread weight across the entire dumpster floor, keeping the heaviest pieces near the center. An unbalanced load shifts during transport, compresses unevenly, and wastes space throughout the container. Test your load by stepping back and looking at it from different angles-the surface should appear relatively level, not tilted or sagging on one side. If you notice uneven settling, redistribute items until the load feels balanced. This attention to weight distribution prevents transport issues and maximizes the cubic yards you actually use.
Know Your Dumpster Size Options
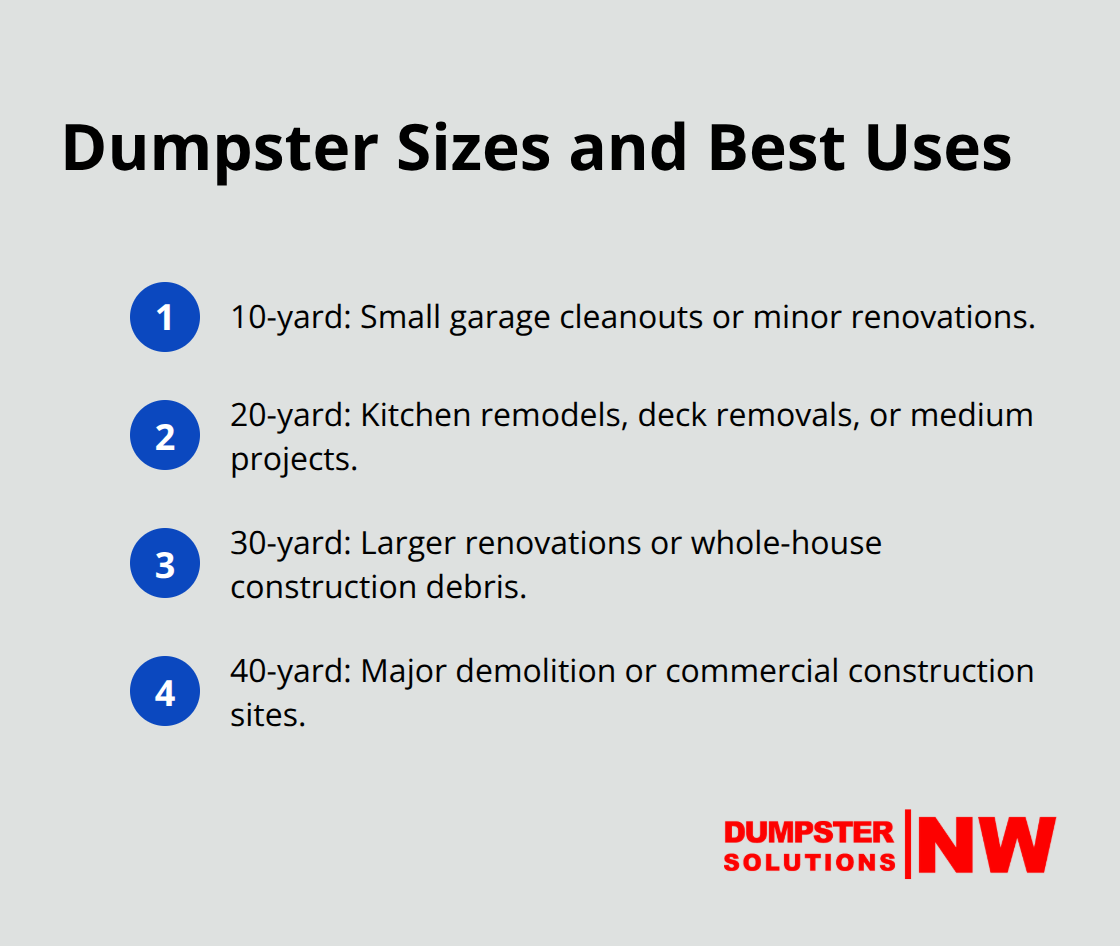
Dumpster sizes range from 10 to 40 cubic yards, and each serves different project types. A 10-yard dumpster works for small garage cleanouts or minor renovations. A 20-yard container handles medium projects like kitchen remodels or deck removals. A 30-yard dumpster suits larger renovations or construction debris from whole-house projects. A 40-yard container accommodates major demolition work or commercial construction sites. Choosing the right size prevents overfilling (which incurs extra fees and creates safety hazards) and avoids renting excess capacity you won’t use. Contact your rental provider with details about your project-they’ll recommend the appropriate size based on your specific waste type and volume estimate.
Final Thoughts
Mastering dumpster loading transforms how you approach waste disposal. The fundamentals are straightforward: break down large items, place heavy materials on the bottom, fill gaps with smaller debris, and organize by category before you start. These techniques recover 20–30% of wasted capacity that most renters lose through poor planning.
Proper packing saves real money because a single extra dumpster rental doubles your disposal costs and extends your timeline. Weight distribution keeps your load stable during transport, while strategic stacking maximizes vertical space you’d otherwise ignore. Sorting materials beforehand cuts loading time in half and prevents the settling problems that create dead zones throughout the container.
Selecting the right dumpster size matters equally-too small creates overfilling problems, and too large wastes rental fees on unused capacity. Most homeowners underestimate volume by 30–40%, so add a buffer to your initial calculation. Contact Dumpster Solutions NW across the Seattle and Puget Sound region, and our team will recommend the perfect fit based on your specific project type and debris volume.
Disclaimer: The information provided in this blog is for general informational purposes only and does not constitute legal, financial, or insurance advice. Coverage options, terms, and availability may vary. Please consult with a licensed professional for advice specific to your situation